Once upon a time in late July of 2015 I needed a PoE Switch to power Snom D765 phones for the phone system in a new office. While checking for fanless devices (I hate noise) I came across the Tenda TEG1009P-EI and immediately loved it. Finally a switch than can not only power 8 phones, but also has a 9th non-PoE Uplink Port so I do not have to waste one PoE capable port to connect it to the rest of the network! Still years later, most other companies do not seem to understand that a switch with only 8xPoE is a bit wasteful because you can at most use seven of them in almost all circumstances.
But unfortunately, after only about 2 years and 4 months of use (in a server closet which is admittedly slightly warmer than it should be) the switch died this week. All phones still had power, but no Ethernet connection anymore. When connecting a non-PoE device nothing happened on the 8 PoE ports and while the PoE devices powered up perfectly fine they all had no Ethernet connection.
I expected Tenda to have a generous warranty but came up empty. I was unable to find anything regarding the warranty Tenda offers in Europe. An email to the German offices of Tenda was never answered, from what I read in the reviews of other Tenda devices on Amazon this seems to be the normal behavior – the German support E-Mail listed on their site is probably going straight to /dev/null.
With no warranty to help, before throwing this reasonably expensive device into the trash, I had a look inside to see if something obvious was wrong with it.
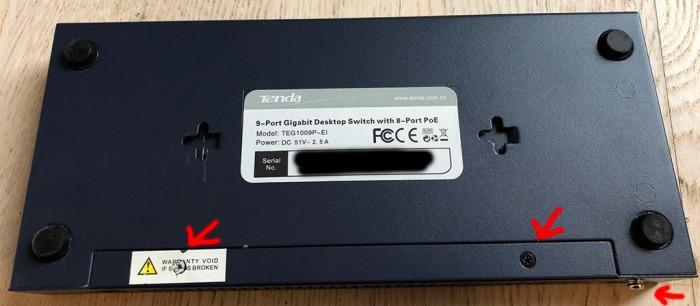
Opening the device is easy. Unscrew the one screw in the back and the two screws on the bottom. You just need a standard Phillips screwdriver of average size, nothing special. One of the screws is beneath a warranty void label. After removing the screws you can pull the two parts of the case apart, this requires some force. I inserted a flat screwdriver in between to make it easier. By the way, you do not have to remove the four rubber feet. After opening the case, you can see the PCB which is fixed to the case by four Philips screws, two on each side and can now easily be removed from the case.
Immediately I noticed that two capacitors looked weird. Those were the two green 16V 470µF shown in the two pictures above. Their top had noticeably expanded and was not flat anymore. I fetched my recently acquired ESR meter (an MESR 100 v2) and used it to check the ESR of the capacitors while still in circuit. Being able to check without removing them from the PCB is soooo cool. Wish I had owned an ESR meter earlier. All capacitors had excellent to ok values, only the ESR value of the two visibly damaged capacitors was horrible.
Therefore I proceeded with removing the defective capacitors with a soldering iron and some wick. I’m sure I did a horrible job so you can be happy there is no video of this, but I got the job done and was able to insert new capacitors into the holes. I checked the voltage across those capacitors before deciding on what to replace them with but since the voltage was only 12V I opted for the same voltage capacitors (16V) as originally in the switch. I replaced the 470µF with 1000µF, only for the reason that I had 1000µF nearby and did not want to order something and wait for it to arrive (in a DC circuit, replacing a capacitor with one of larger capacity is usually not a problem!). Since the 1000µF capacitors were a little bit higher than the 470µF, I opted to mount them sideways to make sure that they do not touch the metal top of the case.
And here is the result. Certainly not beautiful but it gets the job done.
After quickly reassembling the switch I connected my laptop to the previously dead 8 PoE Ports and it’s working again perfectly.
Here’s a picture of the reassembled switch and the removed dead capacitors. By the way: At least from what I can see Tenda seems to have changed the case color to black in recent years. I have no idea if the internals have changed, my PCB was labeled “V1.0”. But if you have the same symptoms (PoE works but no network connectivity) I think you can be pretty sure that you have the same problem.
I also have a TEG1009P (non-EI which means only 4x PoE instead of 8xPoE) in a slightly less warm room of the same office, I’ll add to this post if it dies too 🙂
Update 11/2019: The TEG1009P has now also died the same death (no Ethernet link on all ports, PoE still active). Only one capacitor was faulty here though (I checked the ESR values of all other capacitors and those were perfectly fine), here is a picture of the one I replaced. It was a 10V 1000µF, which I replaced with a 16V 1000µF.
Update 05/2022: another TEG1009P (non-EI) died and was repaired by me using a new capacitor like last time. I used the occasion to make picture of how I replaced the capacitor and added it here as picture number three. Regarding all my previously repaired Tenda Switches: So far all fully operational and no additional faults have occurred so far..
Has your Tenda TEG1009P-EI or TEG1009P died a similar death? If yes, please leave a comment below!

So helpful
LikeLike